martes, 19 de septiembre de 2023
lunes, 18 de septiembre de 2023


domingo, 17 de septiembre de 2023
sábado, 16 de septiembre de 2023
TRAZADO DE UN ARCO OJIVAL SIMPLE
Para hacer el diseño de vidrieras, he encontrado en internet este ejercicio donde se muestra cómo realizar los arcos para el diseño de un vitral gótico.

Sacado de: http://www.mallorcaweb.net/ffoaloke/aula/tgeo5.htm
Estos son ejemplos de algunos de los trabajos realizados por alumnos de 3º ESO
jueves, 14 de septiembre de 2023
miércoles, 13 de septiembre de 2023
lunes, 11 de septiembre de 2023
OUKA LELE
Nacida en Madrid en 1957, comenzó a ser conocida por colorear fotografías en blanco y negro con anilinas y acuarelas.
Sus temas son variados, como temas oníricos y surrealistas, retratos psicológicos, y paisajes de la mitología griega.
viernes, 8 de septiembre de 2023
THALES´THEOREM
DIVIDE A SEGMENT PORQUE INTO EQUEAL PARTS (APPLYING THALES´THEOREM)
Step 1. Draw the ray PM at an angle to the segment PQ.
Step 2. Choose any radius and draw a number of arcs on the ray PM, according to the number of divisions you want on segment PQ. Then label the intersection point of the last arc on the ray PM as point F.
Step 3. Draw the segment FQ. Next, draw parallel lines to FQ that pass through the intersection points of the arcs on the ray PM.
PARALLEL LINE
DRAW A PARALLEL LINE TO A STRAIGHT LINE r THAT PASSES THROUGH AN OUTSIDE POINT L
Step 1. From centre point L, draw an arc that intersects line r at point P.
Step 2. Use the same radius as the previous step. From centre point P, draw an arc that intersects line r at point Q.
Step 3. Use radius QL. From centre point P, draw an arc that intersects the arc from the first step at point R.
Step 4. Draw line m. This is parallel to line r.
DRAW A PARALLEL LINE TO A STRAIGHT LINE s, GIVEN THE DISTANCE d BETWEEN THE TWO LINES
Step 1. Place two points O and M on line s.
Step 2. Use the compass to draw a perpendicular line to s at O.
Step 3. Use the compass to draw a perpendicular line to s at M.
Step 4. Use radius d. From centre points O and M, draw the arcs that intersect the perpendicular lines at points P and Q.
Step 5. Draw the straight line p, which is parallel to line s.
PERPENDICULAR LINE
DRAW A PERPENDICULAR LINE FROM A POINT ON A STRAIGHT LINE
Given C, a point on the straight line r, follow these steps:
Step 1. From centre point C, draw an arc that intersects the line r at two points, D and E.
Step 2. Use D as the centre point. Draw an arc with a larger radius than in the previous step. Keep the same radius and use E as the centre point.
Draw another arc that intersects the previous one at point F.
Step 3. Draw the straight line CF. This is perpendicular to the line r.
DRAW A PERPENDICULAR LINE FROM A POINT OUTSIDE A STRAIGHT LINE
Draw a perpendicular line from a point outside a straight line
Given G, a point outside the straight lines, follow these steps:
Step 1. From centre point G, draw an arc that intersects the line s at two points, H and J.
Step 2. Use H as the centre point. Draw an arc with a larger radius.
Keep the same radius and use J as the centre point. Draw another arc that intersects the previous one at point K.
Step 3. Draw the straight line GK. This is perpendicular to the lines.
DRAW THE PERPENDICULAR BISECTOR OF A SEGMENT AB
Step 1. From centre point A and centre point B, draw two arcs that intersect at points T and U.
Step 2. Draw the line UT. This is perpendicular to the segment AB and it intersects AB's midpoint. It is the perpendicular bisector of segment AB.
jueves, 7 de septiembre de 2023
CONSTRUCTION OF A SPOON WITH TANGENTS
Steps to construct a spoon:
Step 1. Construct an ovoid with a major axis AB of 6 cm.
Step 2. Draw the segment OM 10 cm long. Then use centre point M and a radius of 1 cm. Draw a circumference.
Step 3. Use centre point O and a radius of 9.9 cm. Draw an arc that intersects the circumference with centre M at points R and S.
Step 4. Draw the segments OR and
OS. Then draw a parallel line to OR at a distance of 1.3 cm from OR.
Draw a parallel line to OS at a distance of 1.3 cm from OS.
Step 5. Use centre point O and a radius of OD plus 1.3 cm. Draw an arc that intersects the parallel lines to OR and OS at points H and K.
Step 6. Use centre point H and a radius of 1.3 cm. Draw a
circumference. Then use centre point K and the same radius to draw another circumference. These circumferences define the arcs FG and NP.
Step 7. Redraw the shape of the spoon as shown in the figure.

ACTIVIDADES TANGENCIAS
TRAZADOS DE NÚMEROS CON TANGENCIAS
Dibujamos números utilizando distintos tipos de tangencias para su realización

ARCS
An arch is a structure that covers part of the space between two walls or between two columns. It serves as a decorative element in buildings. Arches are built with wedge-shaped stones called voussoirs. These are placed on top of structural supports.
The parts of an arch are the span, the rise and the springing line.
The voussoir at the top of the arch is called the keystone. It receives the weight of the wall and distributes it sideways.

Each arch has a different name, depending on its shape:

Round arch
The round arch or Roman arch is one that is shaped like half a circumference. Its centre point is on the springing line.

Segmental arch
The segmental arch is one that is shaped like half a circumference. Its centre point is below the springing line.

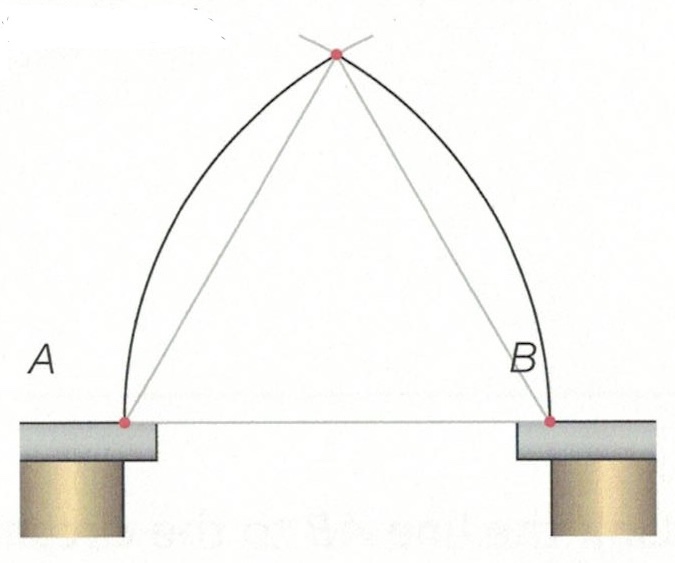
Equilateral pointed arch
In an equilateral pointed arch, the centres of the arcs are the points of support called the springing points. To construct a pointed arch, given the springing points A and B, follow these steps:
Step 1. Use centre point A and radius AB. Draw an arc.
Step 2. Use centre point B and radius AB. Draw an arc that intersects the previous arc, forming a pointed arch.
Horseshoe arch
The horseshoe arch consists of an arc of a circumference. It is longer than the corresponding half a circumference from the same springing points. So, its shape looks like a horseshoe.
To construct a horseshoe arch from its springing points A and B, and with radius r, follow these steps:
Step 1. Use centre point A and radius r. Draw an arc.
Step 2. Use centre point B and radius r. Draw an arc that intersects the previous arc at point C.
Step 3. Use centre point C and radius r. Draw the horseshoe arch from point A to point B.

Three-centred arch
The three-centred arch is formed by a segmental arch, with two arcs of a circumference at its ends.
To construct a three-centred arch from its springing points A and B, follow these steps:
Step 1. Draw the perpendicular bisector of the springing line AB. Label the midpoint C.
Step 2. Find the midpoint of AC and label it M. Then find the midpoint of CB and label it N.
Step 3. Use centre point M and radius MN. Draw an arc. Then use centre point N and the same radius. Draw an arc that intersects the previous arc at point P.
Step 4. Draw the equilateral triangle MP. Draw the rays PM and PN.
Step 5. Use centre point M and radius MA. Draw an arc from A that intersects the ray PM at point F.
Step 6. Use centre point N and radius CN. Draw an arc from B that intersects the ray PN at point G.
Step 7. Use centre point P and radius PF. Draw the arc FG that completes the three-centred arch.

Ogee arch
The ogee arch consists of four arcs of a circumference. Two of the arcs meet at a point at the top in the centre.
To construct an ogee arch from its springing points A and E, follow these steps:
Step 1. Divide the segment AE into four equal parts. This determines the points B, C and D.
Step 2. Draw perpendicular lines to AE at points B and D.
Step 3. Use centre point B and radius AC. Draw an arc to determine point F.
Step 4. Use centre point D and radius AC. Draw an arc to determine point G.
Step 5. Use centre point B and radius AB. Draw the arc AM. Then use centre point D and the same radius. Draw arc NE.
Step 6. Use centre point F and radius AB. Draw arc MP. Then use centre point G and the same radius. Draw the arc PN that completes the ogee arch.

Trefoil arch
The trefoil arch consists of three arcs of a circumference that form the shape of a leaf of clover.
To construct a trefoil arch from its springing points H and L, follow these steps:
Step 1. Divide the line HL into four equal parts. This determines the points /, J and K.
Step 2. Use centre point / and radius /K. Draw an arc. Then use centre point K and radius KI. Draw an arc that intersects the previous arc at point M.
Step 3. Draw the equilateral triangle MIK.
Step 4. Use centre point / and radius /H. Draw an arc from H that intersects MI at R. Then use centre point K and the same radius. Draw an arc from L that intersects MK at point S.
Step 5. Use centre point M and radius MR. Draw the arc RS that completes the trefoil arch.

HEPTAGON
Construct a heptagon, given one side
Step 1. From vertex A, draw an angle of 30°
Step 2. From B, draw a perpendicular line to AB. Where it intersects the 30° angle line, we obtain point N.
Step 3. Use centre A and radius AN. Draw an arc.
Step 4. Draw the perpendicular bisector of AB. At the point of intersection with the arc in step 3, we get point O. This is the centre of the circumscribed circumference of the heptagon.
Step 5. Use centre O and radius OA. Draw the circumscribed circumference.
Step 6. To complete the drawing, copy the length of AB consecutively around the circumference.

Step 1. Draw the perpendicular diameters of the circle, AB and CD.
Step 2. Draw the perpendicular bisector of one of the radius. For example, use OD. This obtains point M. Extend the bisector to obtain point N.
Step 3. The segment MN is the length of the side of the regular heptagon. From vertex A, translate this segment consecutively around the circle.

CONSTRUCTION OF A REGULAR POLYGON GIVEN A CIRCLE
Step 1. Divide the diameter AX of the circumference into the same number of equal parts as the number of sides that the polygon will have (Thales' theorem).
In this case, we are going to draw a nonagon.

Step 2. Use centre point X and radius AX. Draw an arc that
intersects the extension of the horizontal diameter line at V.

Step 3. Draw a straight line that passes through point V and the second division of the diameter (point 2). Where the straight line intersects the circumference, label the intersection point B.

Step 4. Use radius AB. Draw the arcs that identify the vertices of the polygon. Then draw the sides.

GENERAL METHOD FOR DRAWING REGULAR POLYGONS , GIVEN A SEGMENT
Step 1. Given the side AB, draw an equilateral triangle.
Step 2. Use centre point 06. Draw the circumference in which we can inscribe the regular hexagon from side AB.
Step 3. Draw the perpendicular bisector of the segment AB. Where it intersects the circumference, we get point O12. This is the centre of the circumference in which we can inscribe a regular dodecagon from side AB.
Step 4. Divide the segment 06012 into six equal parts (Thales' theorem). Find the centres of the circumferences in which we can inscribe a heptagon O7, an octagon Os, a nonagon 0,, a decagon O1 and a hendecagon 011.
Step 5. Measure the distance between the centres of the circumferences.
Step 6. Copy it onto the perpendicular bisector. This identifies the centres of the pentagon, square and equilateral triangle (O3).
miércoles, 6 de septiembre de 2023
OVAL AND OVOID
OVAL
An oval is a flat and closed curve that is formed by four arcs of a circumference. It is symmetrical with respect to its two perpendicular axes: the major axis and the minor axis.
Construct an oval given only the major axis
Step 1. Divide the major axis AB into three equal parts to define the points C and D. Use centre point C and radius CA. Draw a circle.
Step 2. Use centre point D and radius CA. Draw a circle A that intersects the one made in step 1 at points E and F.
Step 3. Draw the rays EC, ED, FC and FD. These rays intersect the circumferences at points H, J, G and M, respectively.
Step 4. Use centre point F and radius FG. Draw the arc GM. Then use centre point E and the same radius. Draw the arc HJ to complete the construction of the oval.

Construct an oval given only the minor axis
Step 1. Find the perpendicular bisector of CD. Label its midpoint M.
Step 2. Use centre point M and radius MC. Draw a circumference that intersects the perpendicular bisector of CD at points A and B.
Step 3. Draw the rays CA, CB, DA and DB.
Step 4. Use centre point C and radius CD. Draw the arc PORQUE. Then use centre point D and the same radius. Draw the arc RS.
Step 5. Use centre point A and radius AP. Draw the arc PR. Then use centre point B and radius BS. Draw the arc SQ to complete the construction of the oval.

OVOID
An ovoid is a flat and closed curve formed by half a circle, two equal circle arcs and another unequal one. An ovoid also has two axes: the major axis and the minor axis. However, it is only symmetrical to one of the axes.
Construction of an ovoid, given only the minor axis
Step 1. Draw MN and construct its perpendicular bisector. Label the midpoint O.
Step 2. Use centre point O and radius OM. Draw a circumference that intersects the perpendicular bisector of MN at point H. This also creates half a circumference from M to N.
Step 3. Draw the rays MH and NH.
Step 4. Use centre point M and radius MN. Draw the arc NK. Then use centre point N and the same radius. Draw the arc MJ.
Step 5. Use centre point H and radius J. Draw the arc JK that completes the ovoid.

Construction of an ovoid, given only the major axis
Step 1. Divide the major axis AG into six equal parts. Label the points that divide it B, C, D, E and F. Then draw a perpendicular line to AG that passes through C.
Step 2. Use centre point C and radius CA. Draw half a circle that passes through A and intersects the perpendicular line from step 1 at points M and N.
Step 3. Use centre point C and radius CG. Draw half a circle that passes through G and intersects the line MN at points P and Q. Then draw the rays PF and QF.
Step 4. Use centre point P and radius PN. Draw an arc that intersects the ray PF at point R. Then use centre point Q and the same radius. Draw an arc that intersects the ray QF at point S.
Step 5. Use centre point F and radius FS. Draw the arc SR that completes the ovoid.

HIPÉRBOLA
La hipérbola es una curva doble, abierta, plana y simétri-ca, cuya diferencia de distancias a dos puntos fijos F y F llamados focos es constante.
Para la construcción de la hipérbola se parte de la medida del eje real AA' y del eje imaginario BB'
1. Se trazan el eje real AA'y el eje imaginario BB', perpendiculares entre sí. Con centro en O y radio AB se determinan los focos F y F'. Se marcan puntos arbitrarios 1, 2... sobre el eje real.
2. Con centros en F y F' se trazan arcos con radios AT y A'T que se corten en los puntos S, P. S' y P'. Se repite el proceso con los restantes puntos 2, 3... Al unir todos los puntos se obtiene la hipérbola.

PARÁBOLA
La parábola es una curva abierta, plana y simétrica y cuyos puntos equidistan de una recta fija d, llamada directriz, y de un punto fijo F, llamado foco. Tiene un vértice V y un eje de simetría OX que pasa por V y por el foco, y es perpendicular a la directriz.
Para la construcción de la parábola se parte de la directriz y el foco.
1. Se trazan la directriz d y el eje de simetría OX, perpendiculares entre sí. Se sitúa el foco F y el vértice V, que es el punto medio de OF. A partir de F se marcan puntos arbitrarios 1, 2... por los que se trazan perpendiculares a OX.
2. Con centro en F y radios OF. 01, 02... se trazan arcos que cortan a las perpendiculares en A, A', B, B', C, C'... Uniendo los puntos obtenidos se construye la parábola.

CURVAS CÓNICAS
La superficie cónica de revolución se genera cuando una recta g la-mada generatriz, gira alrededor de otra recta e a la que corta. La recta e es el eje de la superficie.Se llaman curvas cónicas a las figuras que resultan de la intersección de un plano con una superficie cónica de revolución. La posición del plano de corte respecto al eie de simetría de la superficie cónica determina el tipo de curva: circunferencia, elipse, parábola e hipérbola.

POLYGON
A polygon is a flat shape formed by three or more straight lines that join at points called vertices.
The resulting line segments are known as sides. The word polygon is a compound word of Greek origin.
It is formed by poly, which means many, and gon, meaning angle. So it is a flat shape with many angles.
Elements of a regular polygon:

• Centre (O): the interior point that is the same distance from all of the vertices. It is the centre of the circumscribed and inscribed circumferences of the polygon.
• Vertex (V): the point where two adjacent sides meet.
• Side (s): one of the segments that form the polygon.
• Radius (r): a segment that connects a vertex to the centre of the polygon.
• Apothem (a): a segment that connects the centre to the midpoint of each side.
• Diagonal (D): a segment that connects two non-consecutive vertices of a polygon.
ELIPSE
La elipse se parece ópticamente a la circunferencia en perspectiva.
La elipse es la curva producida por la intersección de un plano que corta oblicuamente a un cono.
Es una curva cerrada, plana y simétrica.
También se puede definir la elipse como el lugar geométrico de los puntos cuya suma de distancias a dos fijos situados en su interior, llamados focos, es siempre la misma e igual a la medida del eje de simetría mayor.

Dibujemos la elipse de jardinero
Los ejes dados AB y CD se dibujan perpendicularmente cortándose en su punto medio, O. Con la magnitud OD se hace centro en B y se describe un arco que nos corta al eje mayor en F y F°, que son los focos. Clavamos en los focos dos chinchetas; a ellas atamos un hilo fuerte de manera que se quede tenso entre F, A y F'
Con un poco de habilidad dibujamos la curva deslizando el lápiz.

Para la construcción de la elipse se parte de la medida del eje mayor, AB, y del eje menor, CD; que son perpendiculares entre si y se cortan en el punto O.
1. Se trazan el eje mayor AB y el eje menor CD, perpendiculares entre sí. Con centro en C y radio OB se dibuja un arco que corta al eje AB en los focos É y F'. Se sitúa el punto arbitrario 1 entre F y O. Con centros en F y F' y radio 1A, se trazan arcos a los dos lados del eje AB.
2. Con centros en F y F' y radio Bí, se trazan arcos que corten a los anteriores en N, P. N' y P'. Para obtener más puntos de la elipse, se elige otro punto 2 entre F y 0, y se procede de forma análoga. Uniendo los puntos obtenidos se construye la elipse.

ESPIRALES
ESPIRAL DE DOS CENTROS
Se traza una recta r y se marcan en ella los puntos A y B. Haciendo centro en el punto A y con radio AB, se dibuja una semicircunferencia que corta a la recta en el punto C.
Con centro en B y radio BC, se traza otra semicircunferencia y se obtendrá el punto D.
Haciendo centro alternativamente en A y en B y aumentando el radio de las semicircunferencias, se completa la espiral.

ARCOS
Los arcos siempre han sido un tema interesante y atractivo de dibujo en la clase de expresión plástica.
Se llama arco, en arquitectura, a la construcción realizada con piezas para cubrir un vano de una obra, es decir, el espacio entre dos puntos de apoyo.
El arco está en las construcciones de los pueblos primitivos. Estos, para cubrir espacios mayores que la longitud de las piedras, idearon colocarlas saliendo progresivamente de abajo hacia arriba por filas, hasta juntarse en una misma fila en la parte alta del vano.
En todo arco figuran una serie de elementos, que se llaman de la siguiente manera:
Dovelas: Son las distintas piezas que lo componen.
Clave: Es la dovela superior y está en el centro del arco.
Luz: Es la anchura máxima del arco.
Flecha: Es la altura desde la línea de arranque hasta el punto más alto.
Intradós:Es la línea interior del arco
Trasdós: es la línea exterior del arco
Línea de impostas: Es la que indica el comienzo del arco.

tipos de arcos:
Ojival equilátero: arco característico del estilo arquitectónico gótico.

Arco de medio punto, rebajado: Se llama rebajado o escarzado a todo arco cuya línea de impostas está por encima de la horizontal está por encima de la horizontal que contiene el centro o centros.

Arco carpentel: Equivale a medio óvalo. por tanto está formado por un número impar de arcos de circunferencia distintos radios.

Arco ojival lanceado: característico también del gótico, que fue el estilo imperante en Europa durante los siglos XIII al XV.

Arco árabe: Formado por más de media circunferencia y utilizado también por bizantinos y visigodos.

Arco conopial clásico: característico del gótico flamígero. Empleado principalmente en la última época del gótico.

Llamamos construcción adintelada a la que no tiene arco; pero en este caso, por la disposición de las piezas que lo configuran, se puede llamar arco adintelado.


SPIRALS
Spirals are curved lines that rotate around a centre and they move further away from it at each turn.

The separation between each turn is constant.

The separation between each turn increases in a certain way.

The separation between each turn depends on the sequence of numbers 1, 1, 2, 3, 5, 8, 13...
This is known as the Fibonacci sequence.
To look like the shape of the Archimedean spiral, the spirals can be constructed with two or more centres using a ruler and a compass. If a spiral has more centres, the separation between the turns will be closer to a constant value.


Some examples of spirals are:
Construct a spiral with two centres
To construct a spiral given the two points A and B, follow these steps:
Step 1. Draw the segment AB.
Step 2. Use centre point A and radius AB. Draw half a circumference from B to C.
Step 3. Use centre point B and radius BC. Draw half a circumference from C to D.
Step 4. Use centre point A and radius AD. Draw half a circumference from D to E.
Step 5. Use centre point B and radius BE. Draw half a circumference from E to F, forming a spiral from the segment AB.

Construct a spiral with three centres
To construct a spiral with three centres, A, B and C, follow these steps:
Step 1. Draw an equilateral triangle ABC.
Step 2. Extend the sides of the triangle.
Step 3. Use centre point A and radius AC.
Draw an arc from C to D.
Step 4. Use centre point B and radius BD.
Draw an arc from D to E.
Step 5. Use centre point C and radius CE.
Draw an arc from E to F, forming a spiral with three centres.

Suscribirse a:
Entradas (Atom)