Mostrando entradas con la etiqueta Tangencias. Mostrar todas las entradas
Mostrando entradas con la etiqueta Tangencias. Mostrar todas las entradas
miércoles, 23 de abril de 2025
viernes, 1 de marzo de 2024
sábado, 16 de septiembre de 2023
TRAZADO DE UN ARCO OJIVAL SIMPLE
Para hacer el diseño de vidrieras, he encontrado en internet este ejercicio donde se muestra cómo realizar los arcos para el diseño de un vitral gótico.

Sacado de: http://www.mallorcaweb.net/ffoaloke/aula/tgeo5.htm
Estos son ejemplos de algunos de los trabajos realizados por alumnos de 3º ESO

miércoles, 13 de septiembre de 2023
jueves, 7 de septiembre de 2023
CONSTRUCTION OF A SPOON WITH TANGENTS
Steps to construct a spoon:
Step 1. Construct an ovoid with a major axis AB of 6 cm.
Step 2. Draw the segment OM 10 cm long. Then use centre point M and a radius of 1 cm. Draw a circumference.
Step 3. Use centre point O and a radius of 9.9 cm. Draw an arc that intersects the circumference with centre M at points R and S.
Step 4. Draw the segments OR and
OS. Then draw a parallel line to OR at a distance of 1.3 cm from OR.
Draw a parallel line to OS at a distance of 1.3 cm from OS.
Step 5. Use centre point O and a radius of OD plus 1.3 cm. Draw an arc that intersects the parallel lines to OR and OS at points H and K.
Step 6. Use centre point H and a radius of 1.3 cm. Draw a
circumference. Then use centre point K and the same radius to draw another circumference. These circumferences define the arcs FG and NP.
Step 7. Redraw the shape of the spoon as shown in the figure.

ACTIVIDADES TANGENCIAS
TRAZADOS DE NÚMEROS CON TANGENCIAS
Dibujamos números utilizando distintos tipos de tangencias para su realización

ARCS
An arch is a structure that covers part of the space between two walls or between two columns. It serves as a decorative element in buildings. Arches are built with wedge-shaped stones called voussoirs. These are placed on top of structural supports.
The parts of an arch are the span, the rise and the springing line.
The voussoir at the top of the arch is called the keystone. It receives the weight of the wall and distributes it sideways.

Each arch has a different name, depending on its shape:

Round arch
The round arch or Roman arch is one that is shaped like half a circumference. Its centre point is on the springing line.

Segmental arch
The segmental arch is one that is shaped like half a circumference. Its centre point is below the springing line.

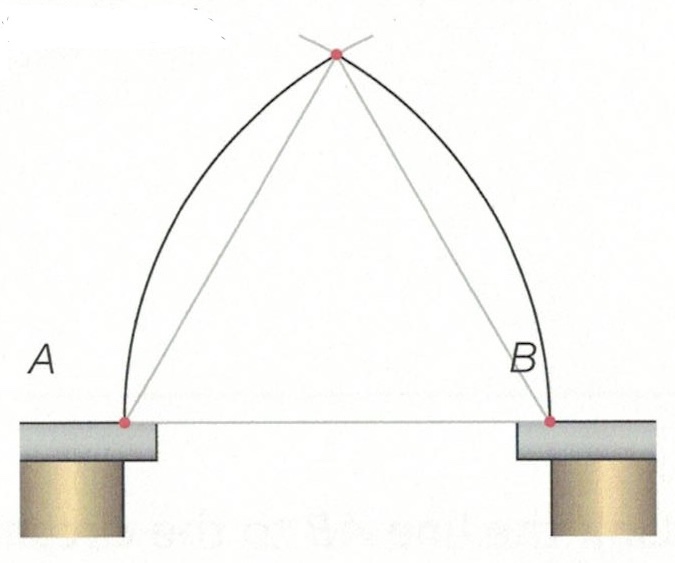
Equilateral pointed arch
In an equilateral pointed arch, the centres of the arcs are the points of support called the springing points. To construct a pointed arch, given the springing points A and B, follow these steps:
Step 1. Use centre point A and radius AB. Draw an arc.
Step 2. Use centre point B and radius AB. Draw an arc that intersects the previous arc, forming a pointed arch.
Horseshoe arch
The horseshoe arch consists of an arc of a circumference. It is longer than the corresponding half a circumference from the same springing points. So, its shape looks like a horseshoe.
To construct a horseshoe arch from its springing points A and B, and with radius r, follow these steps:
Step 1. Use centre point A and radius r. Draw an arc.
Step 2. Use centre point B and radius r. Draw an arc that intersects the previous arc at point C.
Step 3. Use centre point C and radius r. Draw the horseshoe arch from point A to point B.

Three-centred arch
The three-centred arch is formed by a segmental arch, with two arcs of a circumference at its ends.
To construct a three-centred arch from its springing points A and B, follow these steps:
Step 1. Draw the perpendicular bisector of the springing line AB. Label the midpoint C.
Step 2. Find the midpoint of AC and label it M. Then find the midpoint of CB and label it N.
Step 3. Use centre point M and radius MN. Draw an arc. Then use centre point N and the same radius. Draw an arc that intersects the previous arc at point P.
Step 4. Draw the equilateral triangle MP. Draw the rays PM and PN.
Step 5. Use centre point M and radius MA. Draw an arc from A that intersects the ray PM at point F.
Step 6. Use centre point N and radius CN. Draw an arc from B that intersects the ray PN at point G.
Step 7. Use centre point P and radius PF. Draw the arc FG that completes the three-centred arch.

Ogee arch
The ogee arch consists of four arcs of a circumference. Two of the arcs meet at a point at the top in the centre.
To construct an ogee arch from its springing points A and E, follow these steps:
Step 1. Divide the segment AE into four equal parts. This determines the points B, C and D.
Step 2. Draw perpendicular lines to AE at points B and D.
Step 3. Use centre point B and radius AC. Draw an arc to determine point F.
Step 4. Use centre point D and radius AC. Draw an arc to determine point G.
Step 5. Use centre point B and radius AB. Draw the arc AM. Then use centre point D and the same radius. Draw arc NE.
Step 6. Use centre point F and radius AB. Draw arc MP. Then use centre point G and the same radius. Draw the arc PN that completes the ogee arch.

Trefoil arch
The trefoil arch consists of three arcs of a circumference that form the shape of a leaf of clover.
To construct a trefoil arch from its springing points H and L, follow these steps:
Step 1. Divide the line HL into four equal parts. This determines the points /, J and K.
Step 2. Use centre point / and radius /K. Draw an arc. Then use centre point K and radius KI. Draw an arc that intersects the previous arc at point M.
Step 3. Draw the equilateral triangle MIK.
Step 4. Use centre point / and radius /H. Draw an arc from H that intersects MI at R. Then use centre point K and the same radius. Draw an arc from L that intersects MK at point S.
Step 5. Use centre point M and radius MR. Draw the arc RS that completes the trefoil arch.

miércoles, 6 de septiembre de 2023
ARCOS
Los arcos siempre han sido un tema interesante y atractivo de dibujo en la clase de expresión plástica.
Se llama arco, en arquitectura, a la construcción realizada con piezas para cubrir un vano de una obra, es decir, el espacio entre dos puntos de apoyo.
El arco está en las construcciones de los pueblos primitivos. Estos, para cubrir espacios mayores que la longitud de las piedras, idearon colocarlas saliendo progresivamente de abajo hacia arriba por filas, hasta juntarse en una misma fila en la parte alta del vano.
En todo arco figuran una serie de elementos, que se llaman de la siguiente manera:
Dovelas: Son las distintas piezas que lo componen.
Clave: Es la dovela superior y está en el centro del arco.
Luz: Es la anchura máxima del arco.
Flecha: Es la altura desde la línea de arranque hasta el punto más alto.
Intradós:Es la línea interior del arco
Trasdós: es la línea exterior del arco
Línea de impostas: Es la que indica el comienzo del arco.

tipos de arcos:
Ojival equilátero: arco característico del estilo arquitectónico gótico.

Arco de medio punto, rebajado: Se llama rebajado o escarzado a todo arco cuya línea de impostas está por encima de la horizontal está por encima de la horizontal que contiene el centro o centros.

Arco carpentel: Equivale a medio óvalo. por tanto está formado por un número impar de arcos de circunferencia distintos radios.

Arco ojival lanceado: característico también del gótico, que fue el estilo imperante en Europa durante los siglos XIII al XV.

Arco árabe: Formado por más de media circunferencia y utilizado también por bizantinos y visigodos.

Arco conopial clásico: característico del gótico flamígero. Empleado principalmente en la última época del gótico.

Llamamos construcción adintelada a la que no tiene arco; pero en este caso, por la disposición de las piezas que lo configuran, se puede llamar arco adintelado.

lunes, 9 de enero de 2023
miércoles, 7 de junio de 2017
ESCUDO CON TANGENCIAS
Cualquier diseño en la que haya formas curvas, es un buen motivo para utilizar las tangencias. En este caso los alumnos de 3º de la ESO han tenido que utilizar los ejercicios trabajados en el aula para rediseñar el escudo de nuestro colegio.
lunes, 20 de febrero de 2017
lunes, 29 de febrero de 2016
LOGOS CON TANGENCIAS
http://ibrandstudio.com/inspiration/circle-animal-logos-with-tom-anders-watkins?utm_source=feedburner&utm_medium=email&utm_campaign=Feed:+IBrandStudio+(IBrandStudio)
jueves, 18 de junio de 2015
TANGENTS
Drawing two lines tangent to circle from an exterior point P
Step 1. Draw the segment PC.Step 2. Draw the perpendicular bisector of the segment PC and label the midpoint M.
Step 3. Use centre point M and radius MP. Draw a circle that intersects the first circle at points A and B.
Step 4. Draw the lines PA and PB. These lines are tangent to the circle with centre C.

Construct tangent circles with radius m and r
Step 1. Draw a circle with centre A and radius r.Step 2. From A, draw a ray that intersects the circle at C.
Step 3. Use centre point C and radius m. Draw an arc that intersects the ray AC at point B. Draw another arc that intersects it at D.
Step 4. Use centre point B and radius m. Draw an exterior tangent circle. Then use centre point D and radius m. Draw an interior tangent circle to the one with radius r.

Construct exterior tangents to two circles with radius r and r'
Step 1. Draw the segment AB.Step 2. Draw the perpendicular bisector of the segment AB and find the midpoint M.
Step 3. Use centre point M and radius MA. Draw a circle.
Step 4. Use centre point A and a radius equal to the difference between r and r'. Draw a circle that intersects the circle with centre M, and obtain points C and D.
Step 5. Draw the lines AC and AD to obtain points E and F.
Step 6. Draw the lines BG and BH parallel to AE and AF, respectively.
Step 7. Draw the lines EG and FH. These lines are the exterior tangents to the two given circles.

Construct interior tangents to two circles
Step 1. Draw the segment IJ.Step 2. Draw the perpendicular bisector of the segment IJ and label the midpoint K.
Step 3. Use centre point K and radius KJ. Draw a circle, obtaining points L and M at its intersections with the perpendicular bisector of the segment IJ.
Step 4. Use centre / and a radius equal to the sum of the radii r and r'. Draw a circle that passes through points L and M.
Step 5. Draw the lines IL and /M to obtain points N and O.
Step 6. Draw a line parallel to line IL that passes through point J to obtain point Q.
Step 7. Draw a line parallel to line /M that passes through point J to obtain point P.
Step 8. Draw the lines NQ and OP. These lines are the interior tangents to the two given circles.

Linking a circle and a straight line with an arc whose radius ( r) is less than the radius of the circle
Step 1. Draw a parallel line to AB at a distance r.Step 2. Use centre point O and a radius equal to the sum of the radius m and r. Draw an arc that intersects the parallel line at point C.
Step 3. Draw the segment OC that intersects the circles at D.
Step 4. Draw a perpendicular line to the parallel line that passes through point C. Label point E.
Step 5. Use centre point C and radius r. Draw an arc that links the points D and E.

Linking a circle and a straight line with an arc whose radius (q) is greater than the radius of the circle
Step 1. Draw a line parallel to AB at a distance q.Step 2. Use centre point F and a radius equal to the difference between q and p. Draw an arc that intersects the parallel line at point G.
Step 3. Draw the line FG that intersects the circles at H.
Step 4. Draw a perpendicular line to the parallel line that passes through point G. Label point J.
Step 5. Use centre point G and radius q. Draw an arc that links the points H and J

Linking two circles with an arc of a smaller radius
Step 1. Use centre point N and a radius equal to the sum of the radius n and r. Draw an arc.Step 2. Use centre point M and a radius equal to the sum of m and r. Draw an arc that intersects the previous arc at point A.
Step 3. Draw the rays A and MA. Where the lines intersect the circles, label the points B and C, respectively.
Step 4. Use centre point A and radius r. Draw an arc that links the points B and C.

Linking two circles with an arc of a greater radius
Step 1. Use centre point X and a radius equal to the difference between radius r and x. Draw an arc.Step 2. Use centre point Y and a radius equal to the difference between radius r and y. Draw an arc that intersects the previous arc at point Z.
Step 3. Draw the lines XZ and YZ. Where the lines intersect the circumferences, label the points P and Q, respectively.
Step 4. Use centre point Z and radius r. Draw an arc that links the points P and Q

miércoles, 9 de julio de 2014
lunes, 24 de junio de 2013
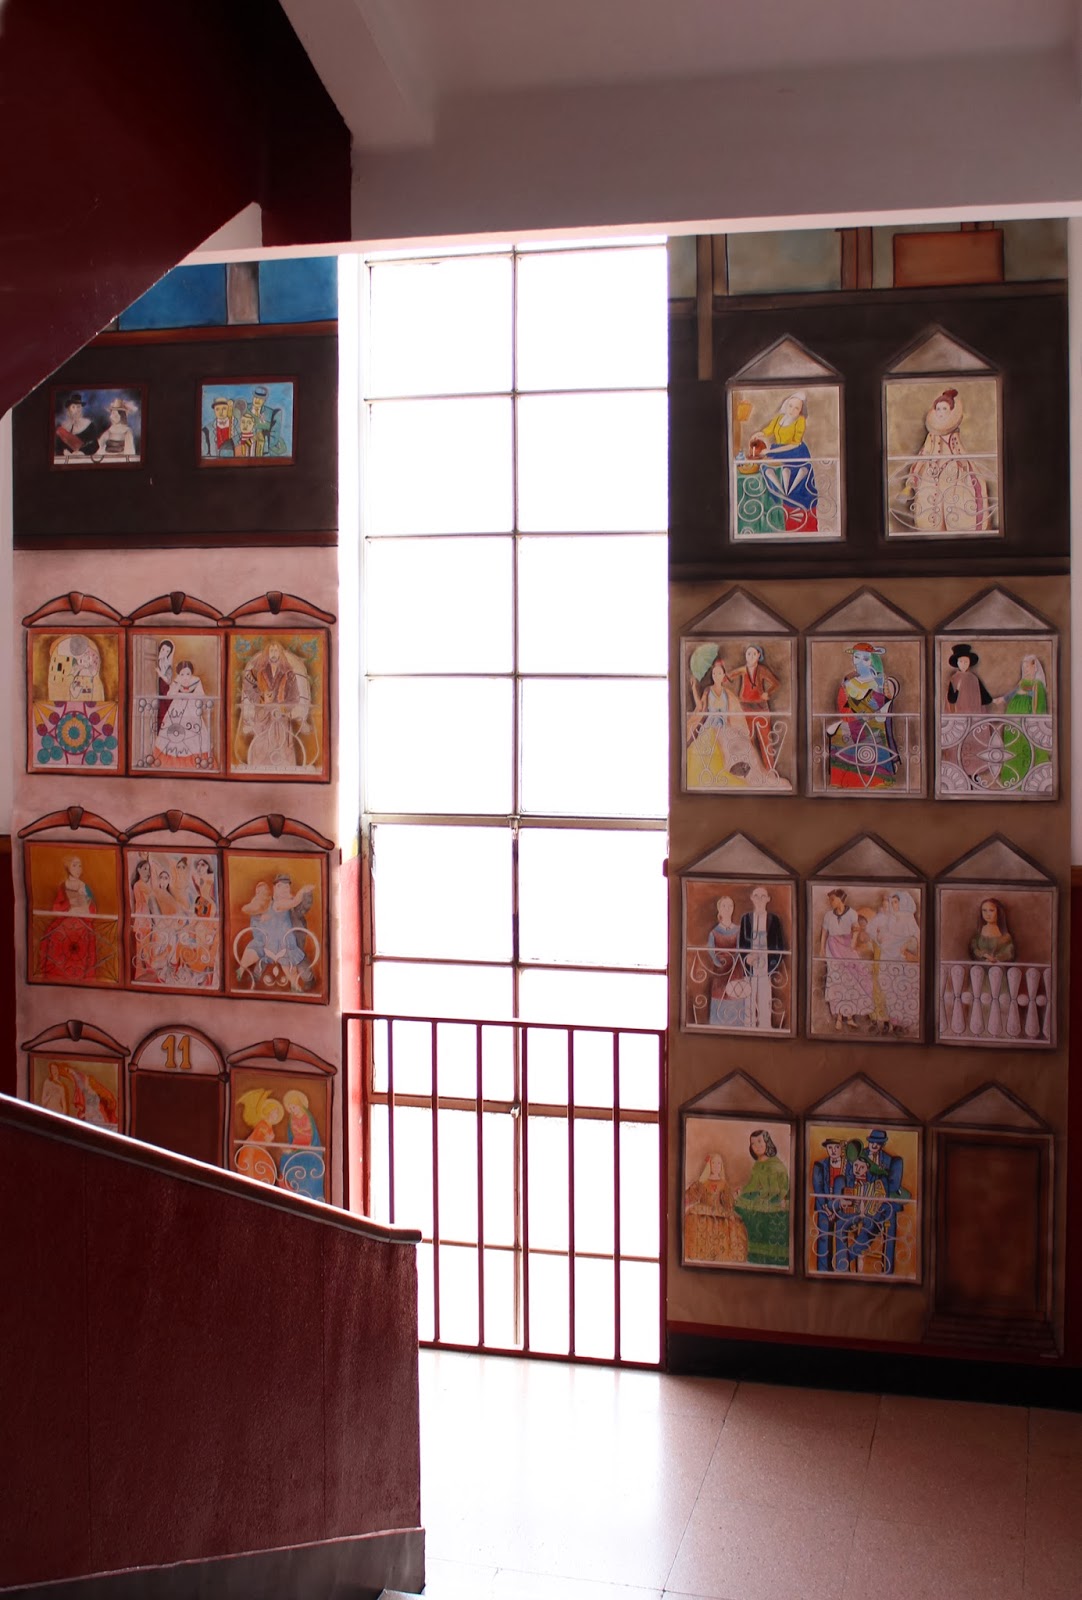
BALCONES CON TANGENCIAS
Otra actividad relacionada con tangencias es su aplicación en el diseño de balcones. Además los alumnos han buscado personajes de obras de arte para que se puedan asomar por el balcón y disfrutar así de las maravillosas vistas que hay desde su casa.
 Por fin hemos podido terminar de colgar los murales de tangencias que hicimos. Eran tan grandes que nos ha costado encontrar un lugar donde pudieran estar, pero creo que al finl han quedado bien.
Enhorabuena a todos mis alumnos por vuestro maravilloso trabajo pero sobre todo quiero dar las gracias a aquellos que me han ayudado a colocarlos en los murales y colgarlos en la pared.
Por fin hemos podido terminar de colgar los murales de tangencias que hicimos. Eran tan grandes que nos ha costado encontrar un lugar donde pudieran estar, pero creo que al finl han quedado bien.
Enhorabuena a todos mis alumnos por vuestro maravilloso trabajo pero sobre todo quiero dar las gracias a aquellos que me han ayudado a colocarlos en los murales y colgarlos en la pared.


sábado, 16 de julio de 2011
TANGENCIAS
Estas son algunas de los trabajos realizados por alumnos de 3º de ESO
ENLACES DE INTERÉS RELACIONADOS CON TANGENCIAS
Tangencias por José Antonio Cuadrado
Tangencias educacionplastica.net
ENLACES DE INTERÉS RELACIONADOS CON TANGENCIAS
Tangencias por José Antonio Cuadrado
Tangencias educacionplastica.net
Suscribirse a:
Entradas (Atom)